
Short circuits are one of the most dangerous and common electrical hazards in DIY projects, capable of causing fires, equipment damage, and serious injuries if not properly prevented.
🔌 Understanding the Enemy: What Actually Causes Short Circuits
Before you can master prevention, you need to understand what you’re preventing. A short circuit occurs when electrical current takes an unintended path with little or no resistance, bypassing the normal load. This creates an excessive flow of current that generates dangerous amounts of heat.
The most common culprits behind short circuits include exposed wires touching each other, damaged insulation, loose connections, water infiltration, and incorrect wire sizing. In DIY projects, these problems often stem from rushed work, inadequate planning, or simply not knowing the proper techniques.
Understanding Ohm’s Law is fundamental here. When resistance drops dramatically due to a short circuit, current skyrockets proportionally. This sudden surge is what trips breakers and can start fires if protection mechanisms fail or don’t exist.
⚡ Essential Planning Steps Before You Start Wiring
The foundation of preventing short circuits begins long before you pick up a wire stripper. Proper planning separates successful DIY electricians from those who create hazardous situations.
Start by creating a detailed wiring diagram for your project. Map out every connection, switch, outlet, and load. This visual reference helps you identify potential problem areas before they become actual problems. Include wire gauge specifications, circuit breaker ratings, and load calculations.
Calculate your electrical loads accurately. Overloading circuits increases heat generation and stress on connections, which can lead to insulation breakdown and eventual short circuits. Use the 80% rule: never load a circuit beyond 80% of its rated capacity for continuous loads.
Tools and Materials Selection Matters
Investing in quality tools and materials is not optional when electrical safety is at stake. Cheap wire strippers that nick conductors create weak points where shorts can develop. Low-quality wire nuts might seem identical but can fail to maintain secure connections over time.
Always purchase wire with adequate insulation ratings for your application. THHN wire is excellent for conduit installations, while Romex (NM-B cable) works for most residential wall applications. Never mix wire types inappropriately or use automotive wire for household projects.
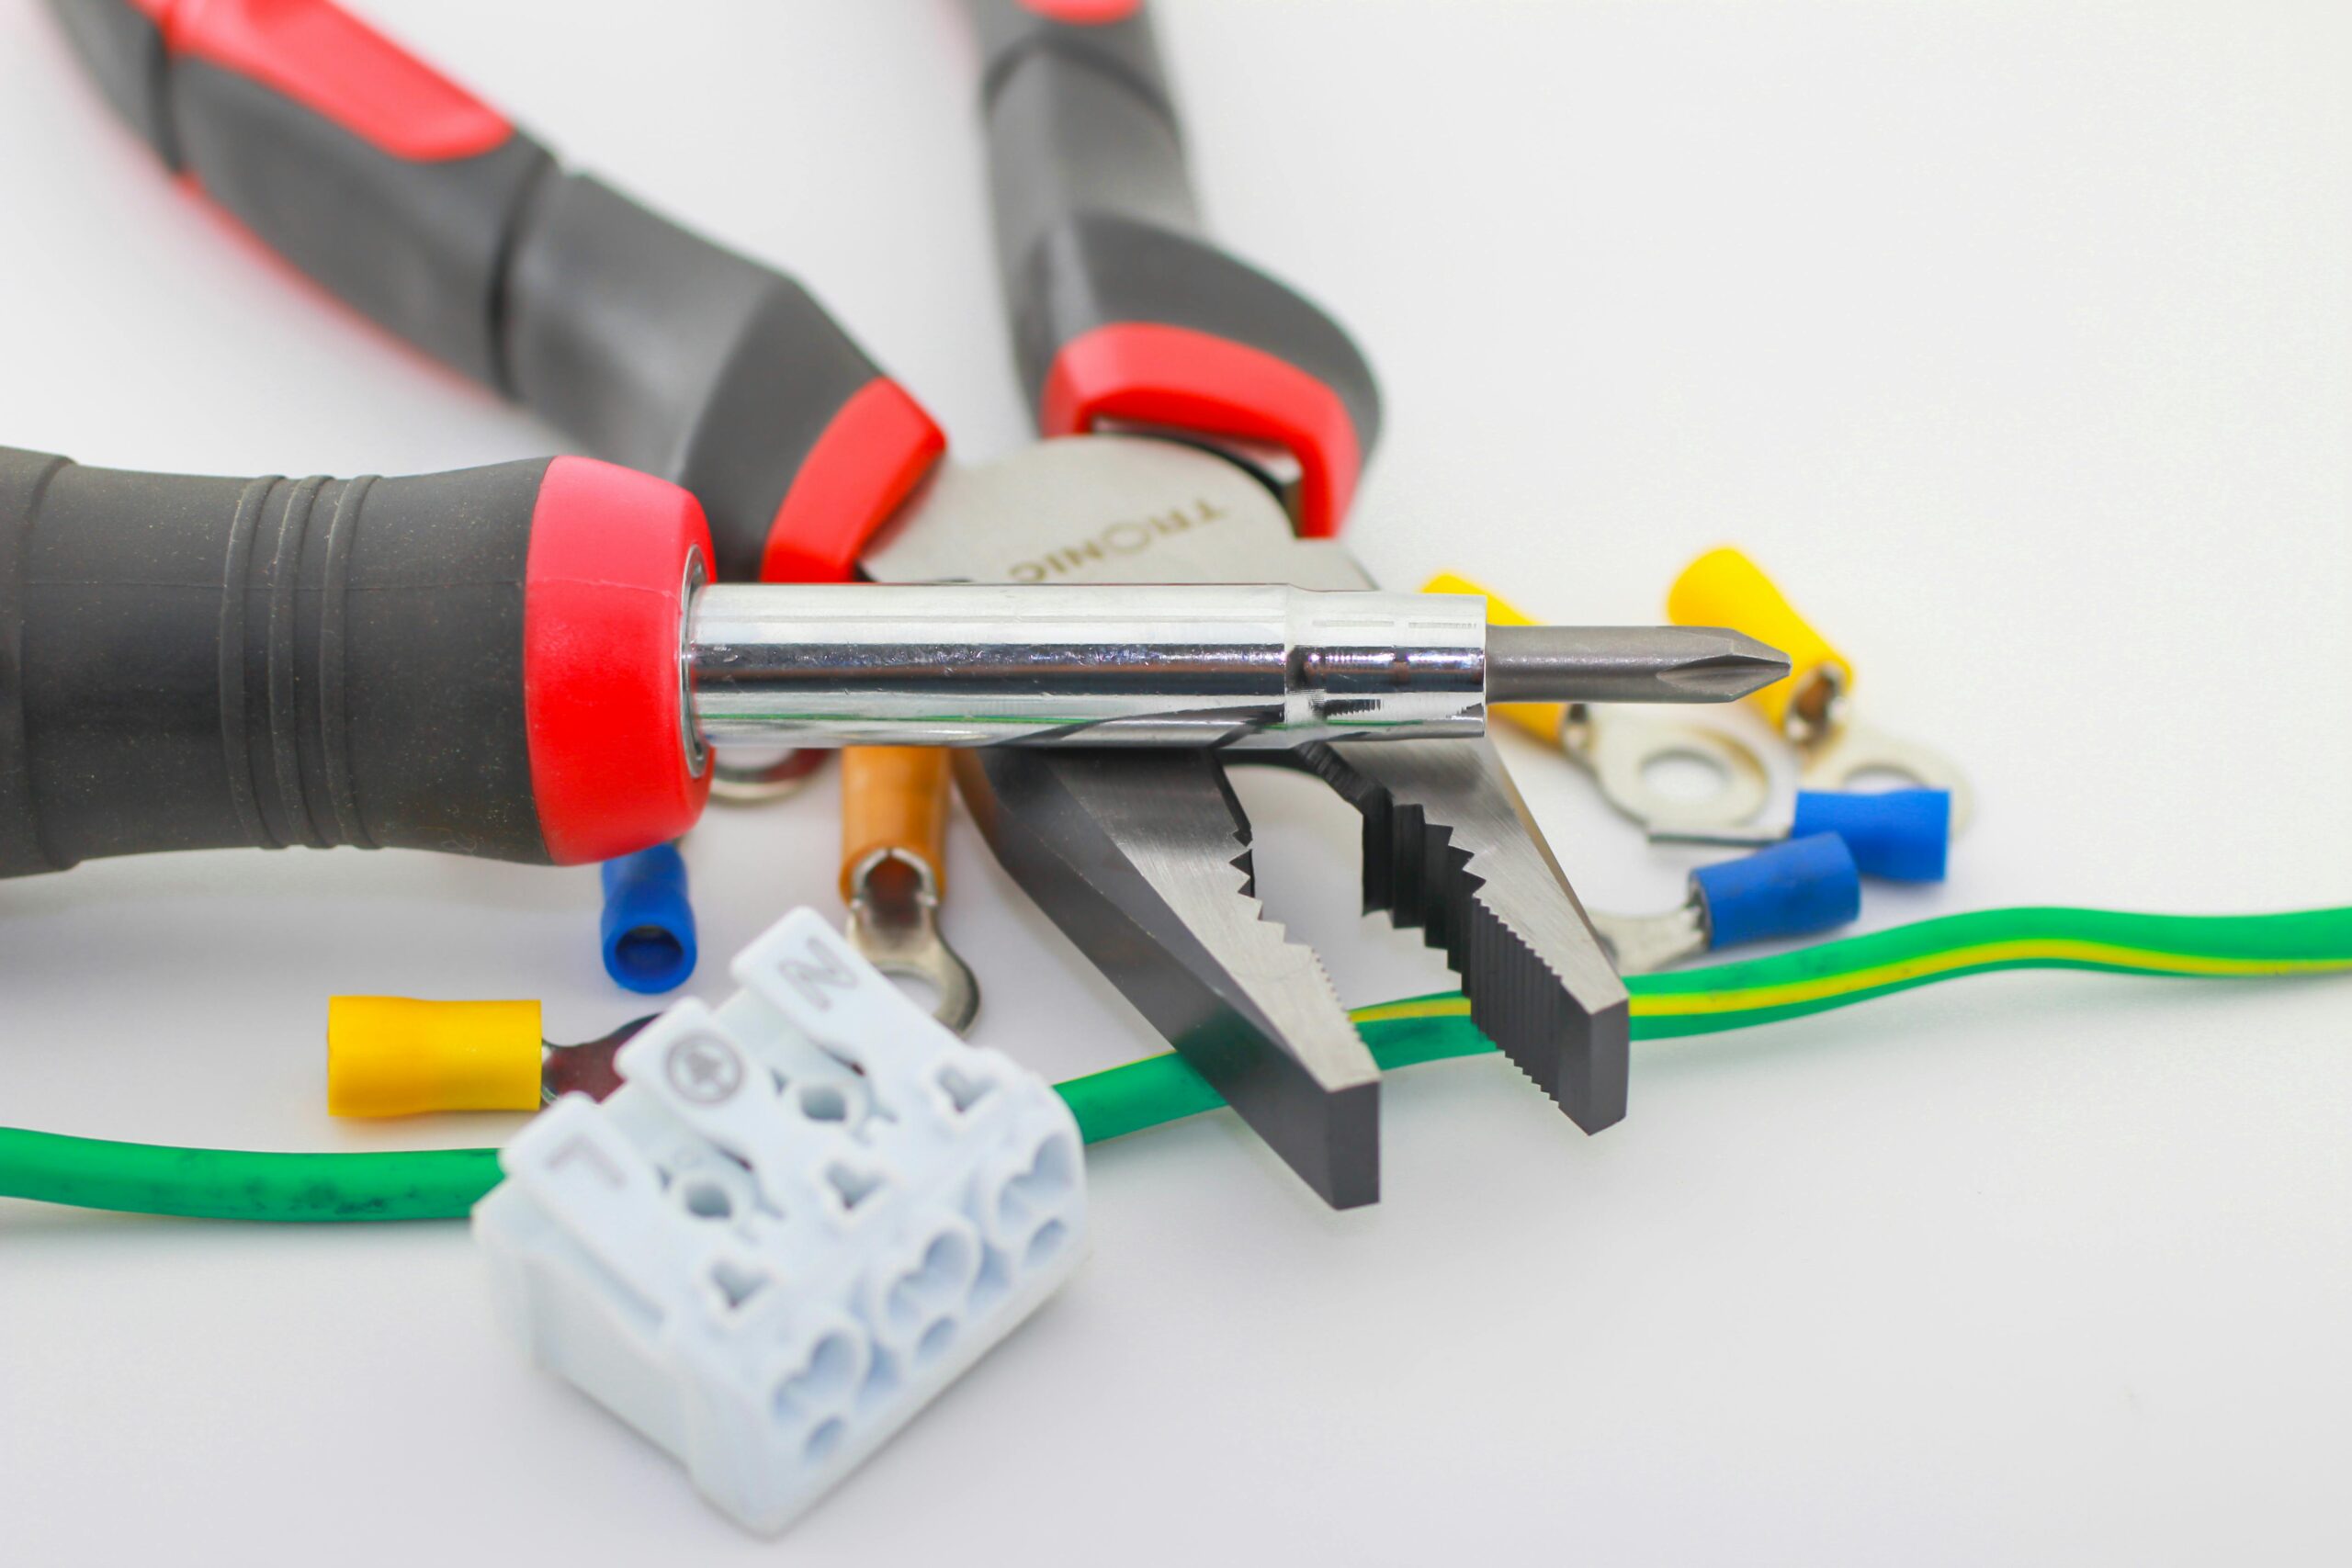
🛠️ Proper Wire Stripping and Connection Techniques
The way you prepare and connect wires directly impacts short circuit risk. Mastering these fundamental techniques is non-negotiable for safe electrical work.
When stripping wire insulation, aim to remove exactly the right amount—typically about 3/4 inch for most connections. Stripping too much exposes unnecessary conductor that could accidentally touch other wires or metal surfaces. Stripping too little prevents proper connections.
Use proper wire strippers, not knives or scissors. These tools are calibrated to cut through insulation without damaging the conductor beneath. Nicked or scored conductors create hot spots and weak points where wires can break, potentially causing shorts.
The Art of Making Solid Connections
Every connection point is a potential failure point. Wire nuts should be twisted clockwise until tight, with no exposed conductor visible below the nut. If you can see bare wire, remove the nut and try again with less stripped insulation or a smaller nut size.
For terminal connections, create proper hooks in solid wire by bending them clockwise around the terminal screw direction. This ensures tightening the screw pulls the wire deeper into connection rather than pushing it out. Strip just enough insulation so the wire hook is completely covered when installed.
Stranded wire requires a different approach. Many professionals prefer crimping ferrules on stranded wire ends before inserting them into terminal blocks. This prevents individual strands from escaping and potentially creating shorts against adjacent terminals.
🔒 Insulation and Protection Strategies
Maintaining proper insulation throughout your project is your primary defense against short circuits. This goes beyond just the factory insulation on wires.
After making connections inside junction boxes, inspect carefully for any exposed conductor. Even a tiny exposed section can cause problems if it touches another wire or the metal box. Use electrical tape to cover any questionable areas, wrapping at least 1.5 times around the connection.
Heat shrink tubing provides superior protection compared to electrical tape for many applications. It creates a sealed, durable insulation layer that won’t unravel over time. Apply it before making connections, then slide it over the finished connection and heat with a heat gun.
Junction Box Best Practices
Junction boxes aren’t just code requirements—they’re critical safety devices that contain potential shorts and prevent fire spread. Never bury junction boxes behind walls or ceilings where they become inaccessible.
Size your boxes appropriately for the number of wires and devices they contain. Overcrowded boxes make proper connections difficult and increase the chance of wires touching inappropriately. Use box fill calculations to determine adequate size.
Metal boxes require additional precautions. All metal boxes must be properly grounded. Additionally, use cable clamps rated for your wire type, and ensure they’re tightened adequately to prevent cable movement that could wear through insulation over time.
💧 Managing Environmental Hazards
Water and electricity form a particularly dangerous combination. Even in seemingly dry locations, humidity and condensation can create conductive paths that lead to short circuits.
For any outdoor projects or areas exposed to moisture, use appropriate materials from the start. GFCI protection is mandatory in wet locations, but proper wire selection matters too. Use wire rated for wet locations (marked W on the insulation) and weatherproof boxes with gasket seals.
In basement projects, consider that concrete floors can wick moisture upward. Keep electrical components elevated, and use moisture barriers where appropriate. Dehumidifiers can help in chronically damp spaces, reducing the conductive effect of high humidity.
Temperature Considerations
Extreme temperatures affect wire insulation integrity. In attics, temperatures can exceed 150°F in summer, potentially degrading standard insulation over time. Use wire rated for elevated temperatures in these applications.
Cold environments present different challenges. Some insulation types become brittle in freezing temperatures, cracking when flexed. For outdoor winter projects or unheated spaces, verify your wire insulation remains flexible at low temperatures.
📋 Testing and Verification Procedures
Even perfectly executed work should be tested before energizing circuits. These verification steps catch mistakes before they become hazards.
A continuity tester or multimeter is essential for pre-energization testing. With power off, test each circuit for shorts between hot and neutral, hot and ground, and neutral and ground. Any continuity reading indicates a short that must be found and corrected.
Visual inspection comes first. With good lighting, examine every connection, looking for exposed conductors, loose wire nuts, or wires touching where they shouldn’t. Wiggle wires gently—nothing should move except the wire itself flexing.
Safe Energization Protocol
When you’re ready to energize a new circuit, follow a systematic approach. First, ensure all devices and loads are disconnected or turned off. Turn on the breaker while standing to the side, and watch and listen for any sparks, buzzes, or smoke—all signs of serious problems.
If the breaker trips immediately, you have a short circuit. Don’t keep resetting the breaker hoping it will work. Disconnect everything, test with a multimeter, and methodically troubleshoot until you find the problem.
Use a plug-in circuit analyzer for outlet testing. These inexpensive devices reveal common wiring errors including some that could lead to shorts. They’re particularly useful for verifying proper polarity and ground connections.
🧰 Common DIY Mistakes That Lead to Short Circuits
Learning from others’ mistakes is cheaper and safer than learning from your own. These frequent errors account for most DIY electrical problems.
Mixing up wire colors seems elementary, but happens surprisingly often. Always follow standards: black or red for hot, white for neutral, bare copper or green for ground. Even in simple circuits, maintaining consistency prevents confusion that can cause dangerous miswiring.
Over-tightening terminal screws can damage conductors or crack device housings, creating short circuit pathways. Tighten firmly but not excessively—most devices specify torque values if you want to be precise.
The Dangers of Modification and Improvisation
Cutting corners or improvising with electrical work is never acceptable. Using wire that’s too small for the current, omitting junction boxes to save time, or jerry-rigging connections with twisted tape instead of proper wire nuts all create short circuit risks.
Modifying existing work without understanding the original design is equally dangerous. Adding outlets to existing circuits without verifying capacity, tapping into wires in walls without proper junction boxes, or extending circuits with different wire gauges all invite problems.
🔍 Troubleshooting Existing Circuits
Sometimes you need to work on existing electrical systems, where hidden shorts might already exist or develop during your work.
When troubleshooting breaker trips, distinguish between overloads and short circuits. Overloads develop when too many devices run simultaneously and often trip breakers gradually as heat builds. Short circuits trip breakers instantly—usually within milliseconds.
Isolate problem areas by disconnecting loads systematically. If a breaker trips with everything disconnected, the short is in the wiring itself. If it holds until you reconnect a specific device or outlet, you’ve found your culprit.
Advanced Diagnostic Techniques
For stubborn problems, an insulation resistance tester (megger) can detect insulation breakdown before it causes complete failure. These tools apply higher voltages than standard multimeters, revealing weak insulation that might pass normal continuity testing.
Thermal imaging cameras have become affordable enough for serious DIYers. They reveal hot spots in electrical systems caused by poor connections or excessive current flow—conditions that often precede short circuits. Inspecting energized panels with thermal imaging can identify problems before they cause failures.
⚖️ Knowing Your Limits and When to Call Professionals
Mastering DIY electrical work includes recognizing when projects exceed your skill level or when regulations require licensed electricians.
Service panel work, anything involving the utility meter, and most 240V circuits generally require professional expertise. The stakes are simply too high, and mistakes can be fatal. Many jurisdictions also require licensed electricians for this work regardless of your confidence level.
If you’re unsure about any aspect of your project—wire sizing, code compliance, proper grounding techniques—consult with a licensed electrician before proceeding. A brief consultation can save you from dangerous mistakes and often costs less than fixing problems later.
📚 Continuing Education and Skill Development
Electrical codes evolve, and techniques improve. Committing to ongoing learning keeps your skills sharp and your projects safe.
The National Electrical Code (NEC) updates every three years. While you don’t need to memorize it, understanding the sections relevant to residential DIY work ensures your projects meet safety standards. Many libraries carry current code books, and online resources provide interpretations.
Hands-on practice with low-stakes projects builds competence safely. Practice wire stripping and connection techniques on scrap wire before working on live projects. Build simple circuits on project boards where mistakes don’t create hazards.
🎯 Creating Your Personal Safety Protocol
Develop and follow consistent safety procedures for every electrical project. Consistency prevents the complacency that leads to accidents.
Never work on energized circuits when you can avoid it. Always verify power is off with a non-contact voltage tester before touching wires. Test the tester before and after each use to ensure it’s working properly—yes, test your tester.
Maintain a clean, organized workspace. Tangled wires, scattered tools, and poor lighting all contribute to mistakes. Good lighting is particularly crucial—you can’t properly inspect connections you can’t clearly see.
Document your work with photos and notes. This creates a reference for future maintenance and helps you remember what’s behind walls. Label circuits clearly in your panel, describing what they control in plain language.
⚡ The Path Forward: Building Safe and Reliable Projects
Mastering short circuit prevention isn’t about memorizing rules—it’s about understanding principles and developing consistent, safe habits. Every wire you strip, every connection you make, and every circuit you test builds your competence.
Start with simple projects that match your current skill level. As your experience grows, gradually tackle more complex work. There’s no shame in simple projects done perfectly—in fact, that’s far superior to complex projects done poorly.
Remember that electrical work rewards patience and precision. Rushing invites mistakes, and mistakes can be deadly. When you feel pressured to hurry, that’s exactly when you need to slow down and double-check your work.
The satisfaction of completing electrical projects safely, knowing they’ll operate reliably for years while protecting your family and property, is worth every extra minute spent doing things properly. Your commitment to preventing short circuits through proper technique, quality materials, and thorough testing demonstrates true craftsmanship in the DIY electrical arts.